Apple roses

Do you remember we said that we had tried out some new recipes for Thanksgiving? (And was that really just two weeks ago?)

Well, one of them was for these apple roses, which we thought would be a cute version of apple pie:


They should really have some icing sugar sprinkled over them, but more about that later…

We’d seen several recipes for these on Pinterest so decided to give them a go. They seemed pretty simple – but we all know about things that seem simple on Pinterest….

Anyway, these are actually pretty simple. This is our recipe, which is based on a mixture of several that we found online, but sadly doesn’t have the same fancy photography as any of them! These would be equally good for Christmas.

Ingredients:

2 or 3 eating apples (preferably with red peel)

squeeze of lemon juice

sheet of ready rolled puff pastry

2 teaspoons of jam (apricot for preference but a ginger preserve would be delicious) mixed with 1 teaspoon of water and heated

ground cinnamon

icing sugar for dusting


Method:

Heat the oven to 375°/190°.

Grease a non-stick muffin tin with some butter.

Core the apples, cut them in half, put the cut side down and slice across. The slices must be really thin. Put the slices into a microwaveable bowl of water with a squeeze of lemon in it.

P1040270

Microwave for about a minute – just until the slices are floppy.

Unroll the puff pastry, roll out slightly more with a rolling pin and then cut into 8 strips.

P1040274

Then spread a little of the jam/water mix on one strip, sprinkle with a little cinnamon. (If you wanted to make them especially Christmassy, you could use mincemeat, which wouldn’t need mixing with water.)

P1040275

Then place overlapping slices of apple along the top length and fold the pasty over like this:

P1040276

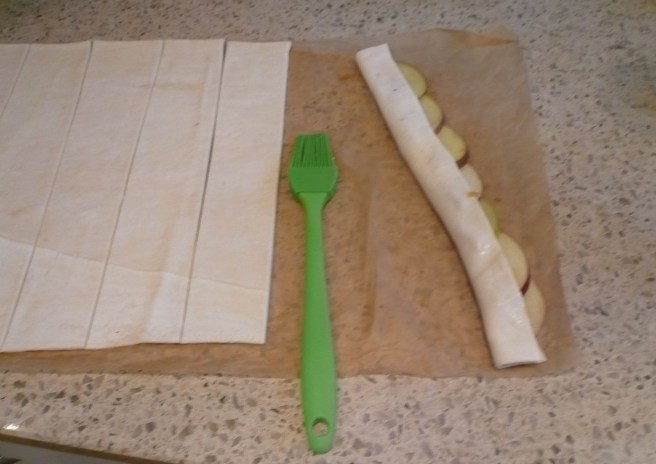
You’ll need 7 or 8 slices of apple for each one. Then just roll up from top to bottom – this is actually easier than it sounds because the slices of apple are floppy – and place in the tin.

Then bake for 30 – 40 minutes. keep an eye on them though – because the apple slices are so thin, they burn easily. If it looks like the apple will burn before the pastry is cooked, cover them with some greaseproof paper. It’s important that the pasty is cooked all the way through.

Ours came out looking like the picture at the top. When they are cold, sprinkle with icing sugar. Sadly we don’t have a picture of that stage because we were running late and by the time the roses were cold, our guests had arrived so we prioritised drinks and canapés instead. And then when it was time to serve them, it didn’t really seem appropriate to start taking photos!

But they went down very well. If you left one of these for Father Christmas with a glass of the Christmas pudding spiced rum, he would either think you were very nice or that you had been very naughty indeed and were trying to make up for it at the last minute!


A little idea we had brewing…

P1040165

We couldn’t help but notice that recently the boot cupboard… how can we put this? We’re friends, so let’s just be honest about this. It’s a bit smelly in there. So when we saw this cool idea for making   a scented bag using a coffee filter, we decided to have a go. Here’s what we did.

First, get together the ingredients:

P1040161

As you can see, a coffee filter, some bicarbonate of soda, some rosemary and a ribbon. Although we used rosemary, you could use any herbs or spices – lavender or cinnamon would be good too! Then you just add two teaspoons of bicarbonate of soda and whatever herb/spice you are using to the filter:

P1040162

Then you just tie it all up with the ribbon. We also added a longer loop of ribbon too so that the bag could be hung up in the cupboard:

P1040167

And that’s it. In fact, it took less time to make than it would have done to use one of those filters to make coffee! And so far, it seems to be effective. You’re just lucky that you’ll have to take our word for that!

We baked you a cake!

Happy Valentine’s Day!

P1030631

We baked you a cake – a big, chocolatey one. So you will have a slice, won’t you?

In case you were wondering,  the recipe is from ‘How To Eat’ by Nigella Lawson, and as you can see from its rather battered appearance, it’s one of our favourite cookery books (not just because the recipes are delicious but also because it is so well written):

P1030628

If you don’t have a copy, you can get the recipe here. The cake in the book is covered in a delicious sounding chocolate ganache, but we used good ol’ Betty Crocker Chocolate Fudge Frosting.

Another slice? Go on. As someone we know used to say, ‘you might as well as wish you had!’

xox

P1030629

Very easy Christmas cushion covers

Now you know that we know Christmas is coming, but as far as we are concerned it doesn’t start until after Thanksgiving. Now that Thanksgiving is over, we can go all out on the preparations!

This year, we decided to make some special Christmas cushion covers and have to share how – so easy. No zips or buttons or anything tricky like that. Just promise that you won’t show any people who are serious about their sewing and might be upset if things aren’t done properly? We love beautifully crafted items just as much as anyone else, but sometimes – for something that’s only going to be used for a couple of weeks a year – all that’s really need is a quick hack. So if you can keep a secret and use a machine to sew in a straight line, you can make these envelope-style cushion covers with minimal expense and effort:

Here’s how.
1. Get your cushion pads. We used some we had already had in the cupboard.
2. Measure:
We had two that were 23 inches square and one that was 17 inches square. (They were only whole numbers in imperial measurements, so that’s what we went with.)
3. Calculate:
For the big cushion we needed a height of 23 inches, plus 2 inches for seams, and a width of 23 inches x 2 plus 6 inches for overlap (this is the most complicated bit). So that’s 25″ x 52″. For the small one it’s 18″ x 42″. That makes a total we needed of 68″ x 52″.
4. Choose:
This is Fryetts Fabric ‘Vintage Christmas’ in Rouge:
(To be honest, we saw it ages ago – but didn’t buy it because Christmas doesn’t start til December, right?)
Furnishing fabric usually comes in widths of 54″ so we needed a length of 68″ (or 1.8 metres).
5. Cut:
Because furnishing fabric usually comes in lengths of 54″, we cut two lengths 25″ x 54″. That meant for the larger cushions the overlap of the ‘envelope’ would be a bit bigger, but the hemming would be easier, because of the selvedge, the self-finished edge of the fabric, which doesn’t fray. For the smaller cushion, we cut a length 19″ x 42″, because otherwise it would end with too much fabric wrapped around the pad.
6. Sew:
We put each piece face down turned down half an inch along the top and bottom, pinned and sewed. 
(Always put the pins in at right angles like in the picture – that way you can sew straight over them and remove afterwards. If they are in lengthways, the needle will hit them and break – annoying, time consuming and possibly dangerous if you get a piece of needle in the eye.) The proper thing would be to fold the fabric over on itself, tack down and then sew, but for our purposes doing it this way was fine.
Then we turned in each side edge (selvedge) and did the same.
On a smaller cushion, you have to turn each side hem that isn’t a selvedge over on itself because otherwise it will fray and the strands will shed.
So now you have, for each cushion, a flat piece of fabric with all the edges turned in and sew down. At this stage, don’t be surprised if it looks a bit big!
7. Fold:
We laid it down, folded the left side in and then the right side on top with an overlap. The width should be the same as the width of the cushion pad. Then we pinned the top and bottom edges in place and sewed. 
8. Turn:
We turned the cover inside out, slipped the pad through the gap and plumped up the cushion. The results are in the picture at the top of the page.
So that’s it, Christmas preparations have begun! 
Holidays are coming, holidays are coming…

Fine feathers make fine blinds

Way back in July, we had a trip to V V Rouleaux and bought this feather trim to put on a blind:

Some weeks later, it still hadn’t attached itself, so we just had to get on and do it. First thought was to sew it on, but that turned out to be a bad idea. The feathers are glued into a kind of ‘ribbon sandwich’ which means that the band at the top of the trim is very stiff. It also means that the needle picks up glue when it goes through, making it sticky and harder to use. When the blind still had no trim but had acquired a small bloodstain on the back, it was clearly time for a rethink…

Fortunately this was one of those times when the lazy solution turned out to be the right one (we love those) and iron-on hemming tape came to the rescue. We cut the tape in half lengthwise to make it narrow enough and then just lined it up on the wrong side of the blind, covered with a damp cloth and pressed with a hot iron for 10 seconds.

Here is the result:

The wallpaper is the very lovely Hackney Empire from House of Hackney – this picture shows more of it.

And here comes a tip of the kind that we only share with friends: For the last couple of years, House of Hackney has had a sale in the run up to Christmas with big savings on all their products, including wallpaper. There’s no guarantee they will do the same this year, but we’ll be keeping an eye out just in case. 

V V Rouleaux

This week we had a trip to V V Rouleaux in Marylebone Lane, London – a fantastic shop for ribbons, feathers and trimmings. The driving force was the need to find something to trim a blind, partly to make it look good and partly because (we can be honest, can’t we?) it hadn’t been measured up properly and could really do with being an inch longer… but nothing at the usual haberdashery shops was very inspiring. Time to visit the expert.
And there we found this wonderful feather trim for £11.75 a metre! Lots of other colours are available too, as well as many wonderful ribbons and braids.
As well as ribbons and trimmings, V V Rouleaux also sells ribbon flowers, corsages, hats and headresses and runs short courses in how to make ribbon flowers, hats and headresses, and tassels and knots. Check them out here. It’s one of those great shops were you come out just wanting to start a project with the goodies in the cute carrier bag:
A picture of the blind with its new trim will follow in due course!

Cutlery drainer lightshade

We’ve always fancied a cheese grater lightshade for the kitchen – couldn’t find a picture to use in this blog, but if you check out ‘Hingham House’ on Pinterest you can see one. Basically, it’s a lightshade, made out of a cheese grater. Simple as that! So the plan was to get a grater and just drill a hole through the handle, pass the cord through and attach the light fitting bit so that the bulb hangs in the body of the grater. But there was a (major) problem… couldn’t find a cheese grater that was big enough to get a light fixture and bulb in! They all seemed to be too narrow at the top.

The next logical step seemed to be thinking about what items of stainless steel kitchenalia ARE big enough to fit a lightbulb in – and so the cutlery drainer light shade was born! (We did think about using a colander, but decided that the drainer would obscure more of the bulb itself from view and that would be good because lightbulbs are not very attractive.)

Admittedly, it doesn’t have the same immediate impact as the cheese grater, but it does make for a cheap, original and stylish (is it OK if we say that?) shade in the same vein.